00:06
The Model Checker configurator is a standalone Windows application that allows you to create
00:11
and edit your own configuration files to use within the Model Checker.
00:16
The configurator can be found on the BIM Interoperability Tools tab of the ribbon, and on the Configurator panel, you'll see Launch.
00:27
All we need to do there is select "Launch".
00:33
And this is the Navigation toolbar.
00:34
We'll go through each one of these one by one.
00:37
But this first page is the General settings.
00:39
This page allows you to open an existing configuration file for editing or create a new configuration file and change the checkset properties.
00:49
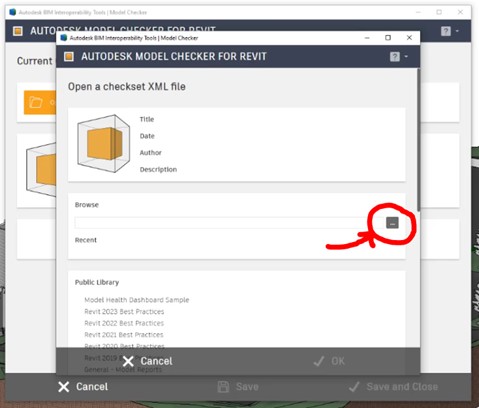
So if I come here to open, it's going to launch the open checkset XML.
00:54
Here, we can browse to a file.
00:57
We can look at our recent checksets and we can also look at some of the publicly available checksets that are prebuilt for us.
01:06
So in this case, we've got airports, we've got general, we've got Revit best practices, we have the USACE stuff,
01:13
a lot of things in here that's a good starting point or that's already been set forth by the client.
01:21
If I select one of my recent ones, I'm going to select the Revit Model Checker for USACE, I am going to select that.
01:27
I'm just going to hit "OK".
01:29
And this is, again, if one has already been built for you or you want to edit an existing one.
01:34
So I'll come down here to the preview checkset just to show you what this checkset consists of.
01:39
We're going to build our own in a moment.
01:41
So I come down here.
01:42
I can just look at this preview.
01:44
You can see all the model checks that are included in this checkset, the element checks that are included in this checkset.
01:51
I can edit that if I want to, so I can kind of drill down in here to what those checksets are, and I can look at them.
01:57
So for example, this model checks here.
01:60
Let's look at the warnings.
02:02
And here in this warning, it says description, reports and lists all warnings in a Revit model.
02:07
The result is count and list of matching elements.
02:10
So we could edit that even further if we need it.
02:13
But let's build our own checkset.
02:15
Let's create one real quick.
02:16
We're going to come here to the general settings and I'm going to simply select New.
02:21
Let's just call this Test Set, author is going to be me, Me, give a description if we want.
02:30
We could give it again a dialogue image, that could be a logo, that could be the project image, it could be anything you want there.
02:36
It's just an image file.
02:38
We can save this or we can do a "Save As" if it's something we've edited.
02:41
I'm going to say "Save" and I'm just going to save that to my desktop.
02:44
I'm going to call that Test Set XML.
02:47
So let's look at what it takes to build a checkset.
02:50
There are three pages here in this dialog box that support the creation of new checks.
02:56
There's the advanced check builder, there's the wizard check builder, and then there's the pre-built checksets.
03:04
Checks created in any of these pages can be added and organized into the checksets on the Structure Organization tab
03:11
and previewed on the Preview Checkset tab.
03:16
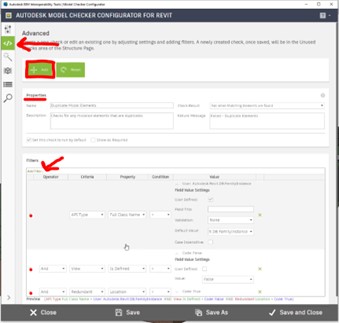
So let's look at the advanced option here.
03:18
This allows you full control over every aspect of your check.
03:22
This is recommended for those that have created checks before.
03:25
So if you're familiar with it, you can kind of create your own checks through this advanced page or if you need a modifying existing check.
03:32
When editing a check, even if created with the wizard, you'll always open it in this interface.
03:39
So if we want to create a new one or add one in here,
03:41
I'm going to say add this to the check to the library of unused, but I'm going to fill this out first.
03:47
So I'm just going to name it here.
03:48
Let's just do Duplicate Model Elements, check result.
03:59
You have a few options here for check result.
04:01
I'm going to say "Fail when model elements are found".
04:05
So when it sees duplicate model elements, that's going to fail or give us a report of failure.
04:14
We can describe it if we want, so checks for any modeled elements that are duplicates.
04:29
And a failure message.
04:30
This is whatever you wanted to say, you could simply say failure.
04:33
You could say Failed Duplicate Elements, whatever you want to put in here.
04:46
And down here in the filters, we can create filters.
04:49
So this is what's going to run against the model.
04:52
So I'm going to say add filter.
04:56
Category - this can be anything.
04:58
I'm going to do API type, full class name equals.
05:03
And then we can put in some information here.
05:10
I'm going to say user defined.
05:15
And default value is, let's see, Autodesk Revit.DB.FamilyInstance.
05:28
Again, this could be anything here.
05:30
We can add more filters here.
05:32
So I'm going to add another filter.
05:34
I'm going to add it to category is view, is defined, and maybe the code here is False, expand my window a little bit, False.
05:52
To add another operator.
05:58
Okay, and is redundant.
06:03
Location equals true.
06:05
We're good there, okay.
06:07
I'm going to add this to the checkset.
06:11
Check added, I'm going to hit "OK".
06:14
So you can go through there, you can rearrange these filters if you want.
06:18
So, you know, it's going to now check the location first where it's going to check the view first.
06:23
Different things you can do in there.
06:24
You can organize these filters however you want.
06:28
I'm going to save that again, just to make sure we saved it.
06:30
This could be a very lengthy filter list here.
06:34
Whatever you wanted to check there, based on the properties here, add filters.
06:39
Pretty straightforward.
06:40
We could do new ones.
06:42
So this is where you begin to build your checkset one check at a time.
06:48
And then we have the Wizard Check Builder.
06:51
So if you're just starting out, this is a very simple way to walk through this dialog box.
06:55
The wizard is going to prompt you with a series of questions
06:58
that will guide you through the creation of a check with the appropriate configuration filters already set.
07:03
So for example, let's just choose one of these.
07:07
Let's choose "This check will count matching elements".
07:11
Okay? And in here, I'm going to choose, "I am checking on views in my model".
07:19
Again, whatever option we want to choose here, I'm checking on model elements in my model, architectural, MEP structural, checking annotated elements,
07:27
whatever we want to choose.
07:30
The categories you want to check, again, whichever one you want to choose.
07:33
Maybe we'll just do Views, View Ports and Sheets, and hit continue here.
07:41
I want to add filters or this check only checks if there are instances of the categories place in the model.
07:47
I'm done building this check and ready to name it.
07:49
I'm going to choose that one.
07:50
Again, we could add additional filters to it.
07:53
We're not in the wizard or if we like what the wizard created, we'll select that.
07:58
The name of this check is "MatchingElements" and you can give a description describe.
08:12
Okay? I'm going to simply select "Finish".
08:16
Okay? So we've got the advanced check builder, we've got the wizard check builder.
08:21
And again, this is all being done in one checkset.
08:26
We then have some prebuilt check.
08:28
So if I select the prebuilt checks, you can simply select "Add Here".
08:32
So warning count reports all warnings in a Revit model.
08:36
You can list those warnings and report.
08:38
Sure, why not? Going to hit "Add".
08:44
And then all these prebuilt checks.
08:46
So we can add a prebuilt check to the checkset.
08:48
So let's just say we want to check for file size, file size, add.
08:57
Maybe you want a list of the largest families, add.
09:01
Okay, prebuilt checks.
09:03
So if there's something in there, you want to check this model, check your linked files,
09:07
whatever it is that you wanted to check, you can check for version.
09:11
I know that's a very popular option here to check for version if some models are not on the same version, some linked models or something.
09:19
But easy to build out this entire checkset.
09:21
So three options, again.
09:23
Advanced, Wizard, and now some of those prebuilt ones.
09:29
Now if we switch to the checkset structure and organization page,
09:33
this allows you to reorganize the checks into different headers and sections and subsections.
09:39
You can add some headings, you could add sections.
09:41
This is just how the structure of that report and that check is going to look and feel.
09:47
We could add a heading.
09:48
I'm just going to leave it Heading 1.
09:52
We could add a section that could be section for modeled elements.
09:56
A section could be a checkset based on families or something like that.
09:60
Anything you want to add, Heading 2 or Section 2.
10:03
It could also refer back to a spec book, however you want to set that up.
10:08
I'm going to come here and I'm going to open one that we're going to use.
10:11
I'm just going to go to open, so we can look at something that's a little bit more complete.
10:14
I'm going to open this Revit Model Checker for USACE, going to hit "OK" here.
10:20
Okay? So pretty simple to create or configure those Checksets.
10:24
Again, open or create a new one and then walk through the three very easy-to-use options here to create.
10:32
You can use all of them, you can use one option, whatever you feel comfortable with using.
10:38
And from there, we'll move over to Model Checker and we will set up, run, and view the report from Model Checker.