00:01
NARRATOR: Modifying the display settings of Revit Links.
00:05
In this video, we're going to test out display settings
00:09
for Revit Links focusing on the host view
00:12
and by linked view methods.
00:17
I'm working in the small Medical Center,
00:19
and I've opened up the O1 ground floor HVAC plan.
00:24
In this view, the structural link is already turned off,
00:28
but I want to further update this view
00:30
by changing how the link to architectural view displays.
00:35
First off I'm going to identify some elements in the linked
00:40
If I hover over an element in the architectural model
00:43
and press Tab, you can see I can select an individual object
00:50
This happens to be a roof as you can see from the type selector.
00:54
I can't make a change here, but at least I know what it is.
00:60
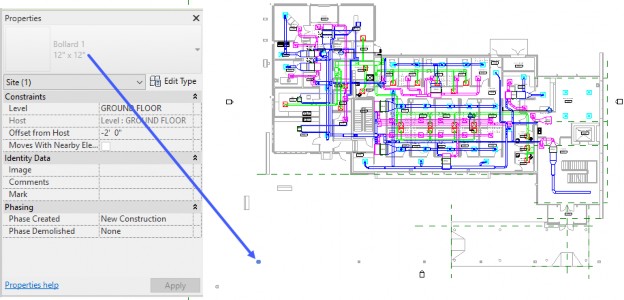
I'm going to do the same thing for a couple of other elements,
01:06
a park bench and one of these little things, which
01:15
is a bollard I want to turn these objects off,
01:22
and the quickest way is to hide them by category.
01:25
And have a shortcut for you.
01:28
Select one of the objects you want
01:30
to turn off in the view and then type VH for view hide.
01:36
All the benches in boller turn the view are turned off
01:39
because they are site elements.
01:41
I'm going to turn off the roof category too,
01:44
pressing Tab to select the element in the linked file,
01:48
and then typing VH to hide the category.
01:52
I could continue going around the view
01:55
and hiding elements I don't want.
01:57
But let's find out what's going on here.
01:60
I opened the visibility graphic dialog box.
02:03
The filter list is set to architecture.
02:05
So I can see all of the architectural categories.
02:09
And you can see that both roofs and site are turned off
02:15
When I switch to the Revit Links tab,
02:18
you can see that the display settings
02:20
for the architectural link is set to by host view.
02:24
This means that any categories you
02:26
modify in the general visibility tabs
02:29
are also applied to the same categories in the linked view.
02:36
Is there an easier way to modify the view
02:38
than selecting each and every category
02:40
that I don't want to see?
02:42
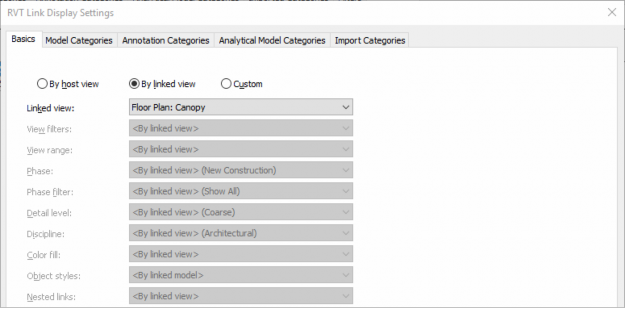
In the display settings, I'm clicking by host view
02:47
and this opens the Revit Link display settings dialog
02:50
box in the Basics tab.
02:53
You can see that there are three options, ,
02:55
by host view by linked view, and custom.
03:01
When I select by linked view, the linked view option
03:06
is available, and here the floor plan canopy is selected.
03:13
Let's see what happens if I apply this option.
03:21
It now says as you can see in display settings
03:23
by linked view I'm going to move it out of the way.
03:33
Not a very useful view.
03:36
I don't want to see all the planting and furniture
03:39
Really all I want to see is walls, doors, and windows.
03:43
So let's try another linked view.
03:49
I'm going to select by linked view,
03:52
change the linked view to ground floor, and click OK, and apply.
04:04
Still not what I want.
04:06
The trees are gone but now there are walls and door tags as well
04:12
Let's try one more time.
04:14
I noticed that there were two MEP views available, one
04:19
for the ground floor and one for the second floor.
04:24
Some nice architect or beam coordinator
04:26
has made sure that there's a view that
04:28
can be used for coordination with MEP projects.
04:32
This makes life a lot easier as long as it's done correctly.
04:37
I'm going to apply the MEP ground floor
04:40
view to my linked view.
04:43
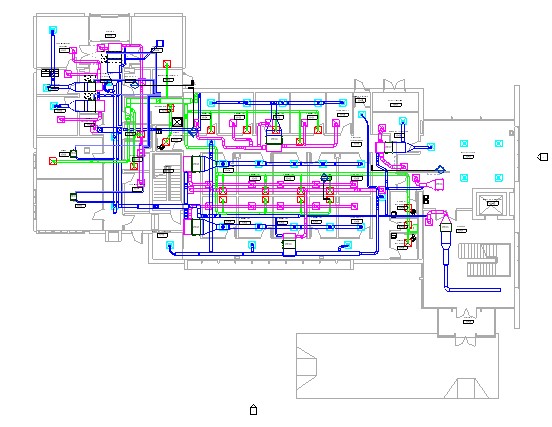
And as I click OK through all the dialog boxes,
04:47
you can see that the display has only
04:51
the most necessary architectural elements showing.
04:56
Now I'm going to open the 02 second floor plan and apply
05:00
the same modifications in the visibility graphics.
05:05
I'm going to turn off the structural link
05:13
and set the architectural link.
05:20
Instead of by host view, I'll pick by linked view,
05:24
and I'm going to set it to floor plan MEP second floor.
05:31
And once I click through all the dialog boxes,
05:35
OK, OK, you can see that my second floor
05:39
plan looks great too.