00:10
ERIC WING: It took me a while to get
00:11
used to the way Autodesk likes to do Rebar.
00:15
It always seemed pretty straightforward to me
00:16
that when you select the concrete element,
00:19
such as a floor or a column, you should have the choice
00:21
to simply turn on reinforcing.
00:24
Certainly, there are many different combinations
00:26
of reinforcing, ranging from placement to sizes to overlaps
00:30
and splices, but I would think there
00:31
could be a dialogue for that kind of stuff.
00:34
Well, there kind of is.
00:35
In this video, I'd like to explain
00:37
how Revit deals with typical reinforcing covers.
00:39
In Revit, I'm going to browse through.
00:41
I'm keeping my exercise files and I'm
00:43
going to open my structural model in the project browser
00:46
under structural plans.
00:47
And make sure you're in lower level.
00:51
Zoom in to column line two, I guess.
00:56
I like this area right here.
00:58
I'm going to cut a section right through this footing
01:01
and through this pier.
01:02
We're going to be moving it back and forth.
01:03
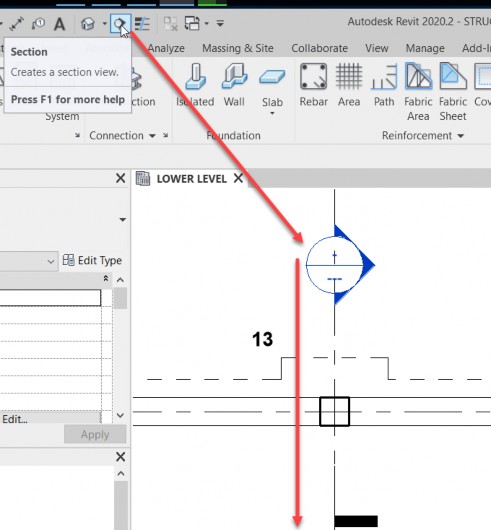
So on the Quick Access toolbar, click the Section button.
01:12
I'm going to put this section right on this column line here.
01:17
I'm going to resolve it right here.
01:21
I'm not a big fan of this line going right through this.
01:23
So notice that we have a little gaps in the Segment button,
01:27
we're going to click on that icon.
01:29
Notice that we can grab this grip
01:31
and drag it up, grab this grip and drag it down.
01:36
I'm going to pull in the extents a little bit.
01:39
Hit Escape a couple of times.
01:41
Now, let's double click on our section marker.
01:47
Not a big fan of the scale.
01:49
So for 1/8 inch, let's change that.
01:52
Click on 1/8 inch equals a foot.
01:55
Let's bump that up to
01:57
which is typical for concrete.
02:02
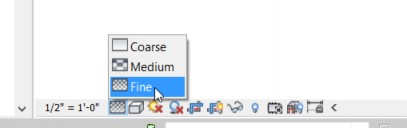
Now, I want to clean this up a little bit.
02:04
First thing I'd like to do is set my detail level to find.
02:09
That's going to join that.
02:10
Now, I want to go to modify.
02:14
Now click on the Join button right here.
02:17
Let's join our wall to our footing here.
02:23
Let's join R4 to our wall.
02:26
OK, now, select any one of these concrete elements.
02:30
I'm going to select my wall here.
02:34
In our properties, let's scroll down till we find Rebar cover.
02:38
What we're seeing is how far from the face
02:40
do we want our Rebar to be so we get cover, so it doesn't rust.
02:45
We have exterior, three to five inches.
02:47
Interior-- Interior.
02:50
And if we click into this, we can change it.
02:55
Hit Escape a couple of times.
02:56
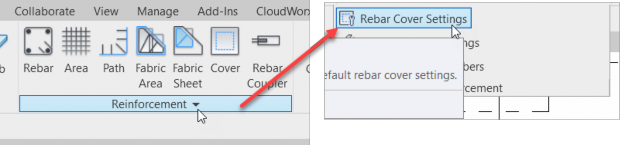
Now, how do we get to the Rebar cover settings?
02:60
So if we go to the Structure tab,
03:04
and we have Rebar over here, or I should say the Reinforcement
03:09
So if you click the Reinforcement tab dropdown,
03:12
notice that we have Rebar cover settings.
03:14
Go ahead and click that.
03:18
Now, here are all of our settings.
03:21
So any time you select an element,
03:22
these settings are going to show up.
03:24
So that's where it's coming from.
03:30
You can save your project in that state.
03:32
I just wanted to show you how Ribar settings work.
03:35
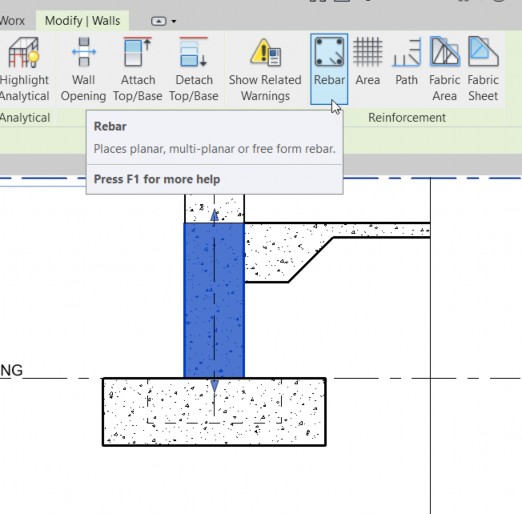
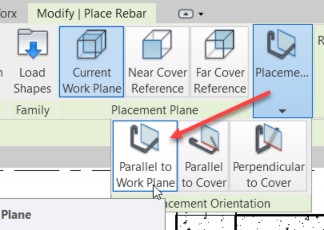
Now, when we start adding reinforcement,
03:37
couldn't select any one of your elements.
03:39
Now, if we click on the Rebar button right here,
03:44
and we go to place it in whatever the default Rebar
03:48
shape is that you have, notice that we get these little dotted
03:52
And Revit doesn't really want you to go past those.
03:55
That's our Rebar cover settings.
03:57
So in conjunction with our Rebar cover settings,
04:01
we can now place Rebar using those.
04:03
Also, when you automatically place Rebar,
04:06
it'll use those settings as a default. Hit escape,
04:09
save your model, you're all set.